Building a D&D Prop with an ESP32: The Root Meridian
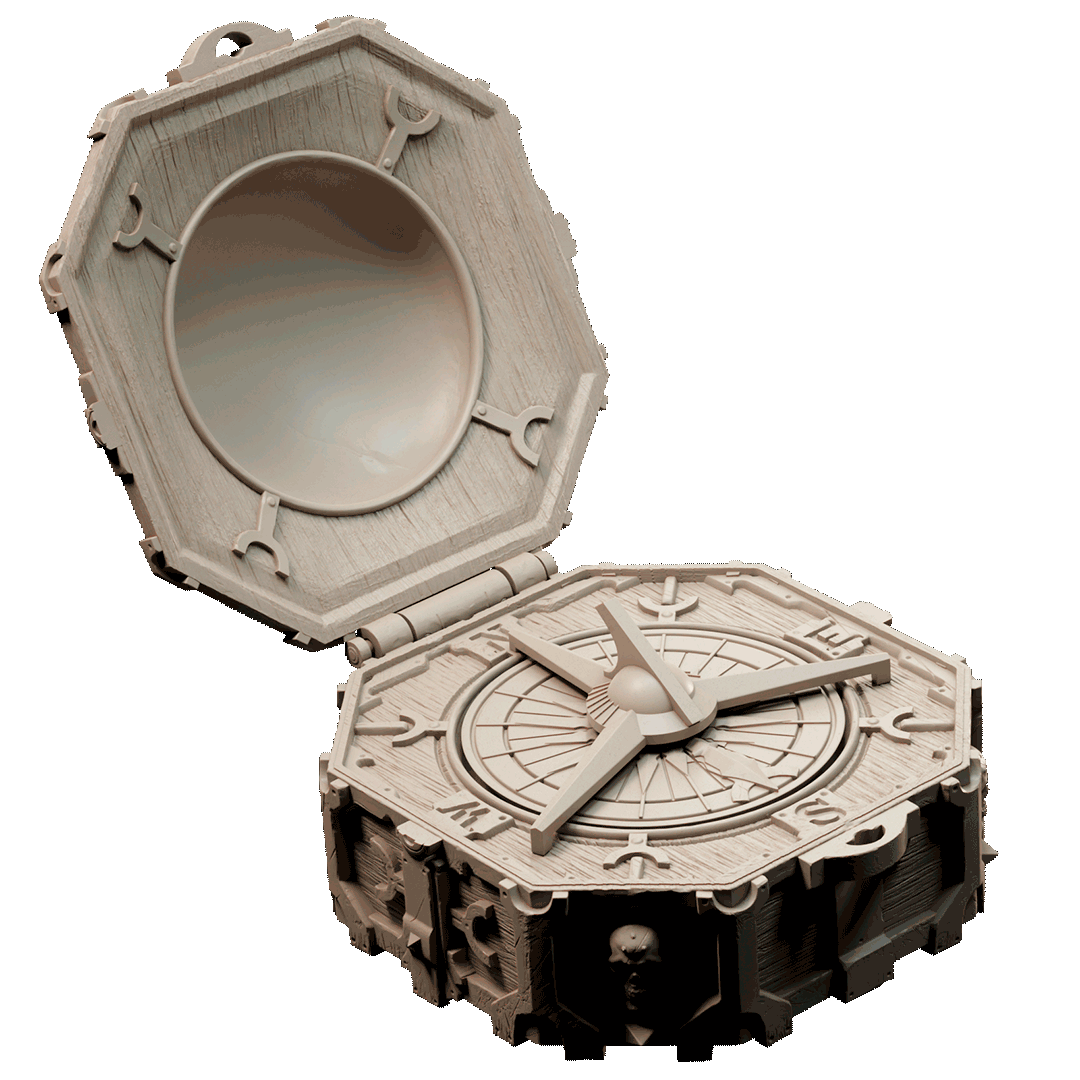
Render: Ship Ahoy bundle — Loot Studios
One of my players runs a character named Trenzor — a Druid of the Tall Trees whose cartographer parents were killed in a gnoll raid when he was young. He fled into the High Forest with almost nothing. The one thing he saved: his father’s compass.
That backstory hit me the moment he pitched it. So as his DM, I asked myself the obvious question: what if that compass actually worked?
Not “worked” as in points north. Worked as in: physically spins its needle to point at party members, glows with colored LEDs, plays audio cues when something dramatic happens — and is secretly controlled by me through Discord.
That’s the Root Meridian. And Trenzor’s player has absolutely no idea it’s being built.
The Story Behind It
In the game, Trenzor’s compass is ancient — a family heirloom that sometimes behaves strangely, tugging toward things the party needs to find. The players already think it’s just a narrative device. They don’t know it’s going to be a real object sitting on the table.
Each of the four cardinal points holds a gemstone tied to a party member:
| Direction | Gem | Player | Advantage on |
|---|---|---|---|
| North | Topaz | Harlen | Next attack roll |
| East | Emerald | Trenzor | Next Nature or Survival check |
| South | Ruby | Levy | Next Stealth or Sleight of Hand |
| West | Diamond | Hobs | Next Initiative roll |
When a player has an advantage ability available, their quadrant of the NeoPixel ring pulses in their gem color. When it’s spent, the quadrant dims to a dark ember. I control all of this in secret — typing !compass north in Discord makes the needle spin dramatically toward Harlen, or !spin sends it into a chaotic whirl before locking on.
The goal: create a prop so good that when the needle slowly crawls to point at someone’s character, the whole table goes quiet. Trenzor’s player picks up his father’s compass for the first time, and it actually works.
The Hardware Stack
I’m a web developer, not an electrical engineer. I’ve never touched an ESP32 before this project. So I picked components that have good documentation, beginner-friendly libraries, and an active community:
| Part | Purpose |
|---|---|
| Adafruit HUZZAH32 Feather ESP32 | The brain — WiFi built in, USB-C charging |
| WS2812B NeoPixel Ring (24 LEDs) | The glow — individually addressable, one data pin |
| 28BYJ-48 Stepper + ULN2003 driver | The needle — 2048 steps per revolution, 0.18° per step |
| DFPlayer Mini + CQRobot 8Ω speaker | The sound — MP3 playback from a micro SD card |
| 1200mAh LiPo battery | Power — hours of runtime, charges via USB-C |
No physical buttons. No switches. The DM controls everything through Discord. That’s an intentional design decision — it reduces mechanical complexity and keeps the magic in the DM’s hands (literally).
What “Wow Factor” Actually Means
I almost over-engineered this completely. My first draft had four mechanical key switches at the compass points for players to physically press when spending their advantage. Then I started adding rumble motors and a display.
I had to have a conversation with myself (and honestly, with Claude) about what actually creates the “wow” moment here.
The answer: it’s the needle. A physical needle that spins erratically and then slowly, dramatically locks onto a player — that’s the moment. Everything else is supporting that moment or distracting from it.
So I cut the switches, skipped the rumble motor and display, and added a speaker instead. Because a compass that sounds like it’s hunting for something — ticking faster as it approaches, then landing with a thunk — is a prop that’ll get talked about.
The Development Approach
I’m building this electronics-first and designing the housing around the confirmed, working components. No guessing at dimensions, no printing a housing that doesn’t fit.
The workflow:
- Simulate in Wokwi — test each subsystem in a browser-based ESP32 simulator before touching real hardware
- Wire on a breadboard — validate the actual components work together before any soldering
- Design the housing in some CAD software — once the electronics stack is confirmed, measure everything and design around it
- Print on two printers — resin (Elegoo Saturn 2) for the detailed face plate, FDM (Bambu P2S) for the structural body
Getting the Dev Environment Running
For anyone else approaching this from a web dev background: the toolchain is more like a compiled language than JavaScript, but the concepts map cleanly.
npm install    →    arduino-cli lib install "Adafruit NeoPixel"
npm run build  →    arduino-cli compile --fqbn esp32:esp32:featheresp32 firmware/compass
node index.js  →    flash the .bin to the chip
The main difference: your “server” is a microcontroller running in an infinite loop with no OS underneath it. Every Arduino sketch has two functions:
void setup() {
  // runs once on boot — initialize hardware here
}

void loop() {
  // runs forever — your main logic here
}
I set up Wokwi (a browser-based ESP32 simulator) inside Cursor, installed the Arduino CLI, and got a 24-pixel NeoPixel ring breathing green within an afternoon. Not bad for a first embedded project.
First Working Code: Breathing Green
The first real milestone: all 24 LEDs pulsing slowly in green — the “available” idle state of the compass.
#include <Adafruit_NeoPixel.h>
#include <math.h>

#define LED_PIN    14
#define LED_COUNT  24

Adafruit_NeoPixel ring(LED_COUNT, LED_PIN, NEO_GRB + NEO_KHZ800);

void setup() {
  ring.begin();
  ring.show();
}

void loop() {
  float t = millis() / 1000.0;
  float wave = (sin(t * 3.14159) + 1.0) / 2.0;
  uint8_t brightness = 20 + (uint8_t)(wave * 160);

  for (int i = 0; i < LED_COUNT; i++) {
    ring.setPixelColor(i, ring.Color(0, brightness, brightness / 6));
  }
  ring.show();
  delay(16);
}
A few things worth noting if you’re new to this:
millis()is likeDate.now()— milliseconds since the chip bootedsin()produces a wave from -1 to +1; shifting and scaling gives us a smooth 0–1 pulsebrightness / 6adds a hint of blue to the green, making it feel more mystical than lime greendelay(16)caps it at ~60fps — no need to go faster
One critical lesson: GPIO 6 on the ESP32 is connected to internal flash memory. My first sketch used GPIO 6 for the NeoPixel data line. Would have damaged the real board. Always cross-reference your pin choices against the actual board pinout.
What’s Next
The electronics stack is fully acquired and sitting on my desk. Next up:
- Wokwi sketch 2: erratic → lock-on NeoPixel animation with audio cue hooks
- Wokwi sketch 3: stepper motor seek, erratic, and lock-on motion modes
- First breadboard wiring — testing the real hardware
- Housing design in TinkerCAD
I’ll be documenting the whole build here. If you’re a DM who’s ever thought about building a prop but assumed it required an electrical engineering degree — it doesn’t. It requires patience, a breadboard, and being comfortable Googling error messages.
The compass is going to make it to the table.